Tesla Owners Online Forum banner

Center console removal

101K views 79 replies 33 participants last post by  MrTofuDragon  
Afterwards, I was speaking with my mobile service technician a few days later and I asked him if he had ever removed or disassembled a Model 3 center console and to my surprise he had. His way would have been the easier way as it involved removing the entire console from the car and it was much easier than I ever imagined. The steps he described involved removing the carpet side covers on both sides of the console; remove the 2, 10mm bolts on each side; remove the 2 screws that are recessed inside the cubby under the phone shelf; remove the plastic trim on the rear of the console and remove 2 screws there; and finally as you are removing the console, unplug the Mini USB cable and power wires connected to the USB module on the back side of the cubby and also unplug the other wires feeding the 12 volt socket and USB ports on the rear of the console. This would have prevented me from having to remove the cubby to gain access to drill the holes and mount the sockets. I would imagine I could have taped the power wires for the 12 volt socket there.
Thanks to this impressively detailed 2nd-hand summary I am tempted to try to remove my console so I can wire up everything cleanly. Newly available parts catalog (center console is here; you need to log in as general public first) seems to back up this summary. I'll take lots of notes and photos and publish if successful.
 
Well I did it. Removed the entire center console, rerouted the power for my USB hub, and put the console back in and everything seems to have gone fine.

First a note: after you remove your console (actually it's after you disconnect the wiring harness in the back of the console), you can not drive your car. So bear that in mind! Power seats work fine, probably everything except driving, but I forgot to do a thorough check.

Basically, I just followed 1st Model 3 in Huntsville's retelling of what the Tesla Ranger told him, and it worked exactly as described.

First, remove the carpeted side panels. The two 10mm screws you need to remove are on either side of the yellow tape. For the passenger side, I found the carpet easiest to remove by pulling from the top under the dash. Do not start there for the driver side panel!

Image


This is why you don't start at the top front on the driver side: This hook is holding that corner in place. I found the driver side panel to be a lot harder than the passenger side. I ended up starting at the very back of the panel.
Image


Once the driver side panel is removed, remove the two 10mm bolts on that side as well:
Image


The biggest challenge I had was the "remove the 2 screws that are recessed inside the cubby under the phone shelf" step. It took a while for me to find them. The screws (Torx 20 heads) are right under the hinge for the phone tray:
Image


You want to unscrew the recessed ones, not the other ones. I just did this (and later replaced them) blind/by feel. Wasn't as hard as I thought it might be.
Image


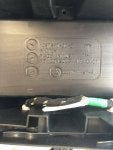
Now, pop off the cover at the rear of the console:
Image


And disconnect the connector. IIRC you push down on that little metal middle clip and it pulls apart:
Image


Then disconnect the USB cable at the front passenger side:
Image


It's now ready to be removed! I pulled back on it to disconnect it from the HVAC up front; it slides back a few cm. Then I lifted up and back from the rear while lifting the front as soon as it seemed ready and then worked it out the front passenger doorway. You'll be moving the seats back and forth throught this procedure, but for this both seats should be all the way back and as backs as far down as they will go.

I have to say it wasn't particularly hard.
Image


I'll start another post showing the minor mod I made and a lot of Deep Inside Tesla Model 3 porn.
 

Attachments

Here's what the car looks like without the console (this is prior to my thorough vacuuming):
Image


Image


Image


The front of the console (with USB hub):
Image


And here's the bottom of the console (I hope everyone appreciates the juxtaposition of the "Eat Awesomely" shopping bag with the King-Size Butterfinger):
Image
Image
Image
 

Attachments

Finally, here are the details of my minor mod (routing 5V to a microUSB cable in the front compartment for a powered USB hub).

To get the wire from the compartment to 12V power under the cup holder, I drilled a 4mm hole at the bottom of the small "ledge" under the phone trays. I just drilled from the plastic side with no prep; inside the compartment the hole looked clean despite my laziness.
Image


I then cut the big USB connector off a microUSB cable and fed it through the hole. The microUSB side of the cable is inside the compartment, the is then run through the hole, along the bottom, and up to where the back of the 12V outlet is under the cupholders. I don't have a lot of pictures here, but how to remove the cupholder top has been documented earlier in this thread. The last photo shows a little light leaking through from the opening where all the cupholder connectors are:
Image
Image
Image


I don't have any photos for how I connected it under the cupholder and that's mostly because no one should wire it the way I wired it (I'm an electrical engineer so I know how technically wrong what I did was but also know it will work but also I know I could probably be sued if it seemed like I was recommending it). Basically I tapped the 12V from the power adapter, ran it to a 12V to 5V converter (I don't have a part number - it's an old module I've had for 15 years that I never used until now), connected the 5V output to the black (GND) and red (+5V) wires in the USB cable, hotglued the whole mess together to isolate the connections and prevent wire movement at the connections, put some foam in strategic locations to keep it in place and not rattling, and put the cupholder back on.

Happy to answer any questions anyone has!
 
Wish I would have gone this route of removing the entire console first and glad to see you did. So was your entire project to just provide USB power to a micro USB cable for a hub? What are you using the hub for?
Shortly after I got the car I added a powered hub so I have ports for the 2 phone docks, a corded extension for my wife to use her phone (up close) while I drive, and 1 or 2 USB memory sticks. Before I had a USB adapter plugged into the 12V outlet and ran the wire under the trim on the side of the console. Routing it this way is a lot cleaner and frees up the 12V port for other stuff.

But the main reason I yanked the console was just to see if I could and hopefully enable other people to do the same with (like yours) more interesting mods.
 
Great job yonkiman and 1st Model 3 in Huntsville!!!

I have been planning to do the same mod, and add 2 x 12V sockets to the front of the console by the existing USB's, but could not find details on how to get there without damaging anything.

One other thought I had was to drill a hole in the inside bottom center of the 1st cubby section of the console, passing under the cup holders, and one in the rear section of the front cubby, and just run the 12v plug and cable between the 2 openings cleanly.
This way I can use the existing 12V socket with a car socket splitter that also has dual USB, like this one:

I was worried that I may damage something in the bottom center of the console, but it seems that it's doable, no? Can you please advise? Thanks.
Sorry for the delay - haven't revisited this thread in a while.

I wouldn't recommend you drill a ~1 inch hole in both cubbys and try to fish the 12V plug through. Both for practical reasons (I don't think you'd be able fish the plug from one end to the other - it's really tight and twisty) and aesthetic (please don't drill two huge holes in your console just to run a small wire through them). I'd recommend you disassemble one of the two ends of the assemblies, desoldering the wire, fish the thin wire through (using one of the two techniques in this thread), then resolder and reassemble the rest.
 
why not just add two 12v sockets similar to what @1st Model 3 in Huntsville did? wouldn't that be even cleaner yet and give you more flexibility as to what you can plug in there?
1) I'm not crazy about the 12V connector bulk and cord management involved in 1M3iH's otherwise very elegant solution. Right now I just have this very compact USB hub being powered by a 5V line coming through a 3mm hole in the bottom corner of the cubby.
Image

2) I currently sorta wish I had done what 1M3iH did, because I realized that all I really want is 2A/plug of charging for my phones - they don't need the data - and for that I need 12V instead of the 5V I ran. I plan to fish the cable from a 12V USB power thingie through to replace the 5V line, but that will likely take a few hours vs the minutes it would take if I'd done what 1M3iH did. However I'll still have less cabling bulk in the end so I don't mind too much.

Both approaches have their merits.