

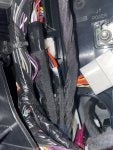
For those of you looking for a nice switched 12v output for add-on accessories in your 3, I have found a good safe place to attach. See my YouTube video.
See the video's description for more details on this as well.
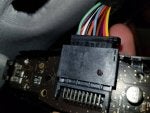
If you want a non-switched line for a dashcam, you can tap the yellow wire that feeds the overhead light/hazard switch console. The black wire on the opposite corner is ground.
If you want a non-switched line for a dashcam, you can tap the yellow wire that feeds the overhead light/hazard switch console. The black wire on the opposite corner is ground.

")


